Vinyl Fence Installation Instructions
Basic Vinyl Fence Installation
1. Getting Started
Here are some tips before you get started on your fence installation project. Read though the entire installation instructions before you begin. Prevent the fencing material from getting scratched by keeping it in the packaging until needed and set it down on level and smooth surface. Some cutting of the fence components will probably be required. Use a fine-tooth blade or a metal blade in your saw. Call all your local utilities to mark any underground lines. Do not start to pound and posts or dig holes until you know where any buried lines are. Find out where your property lines are.
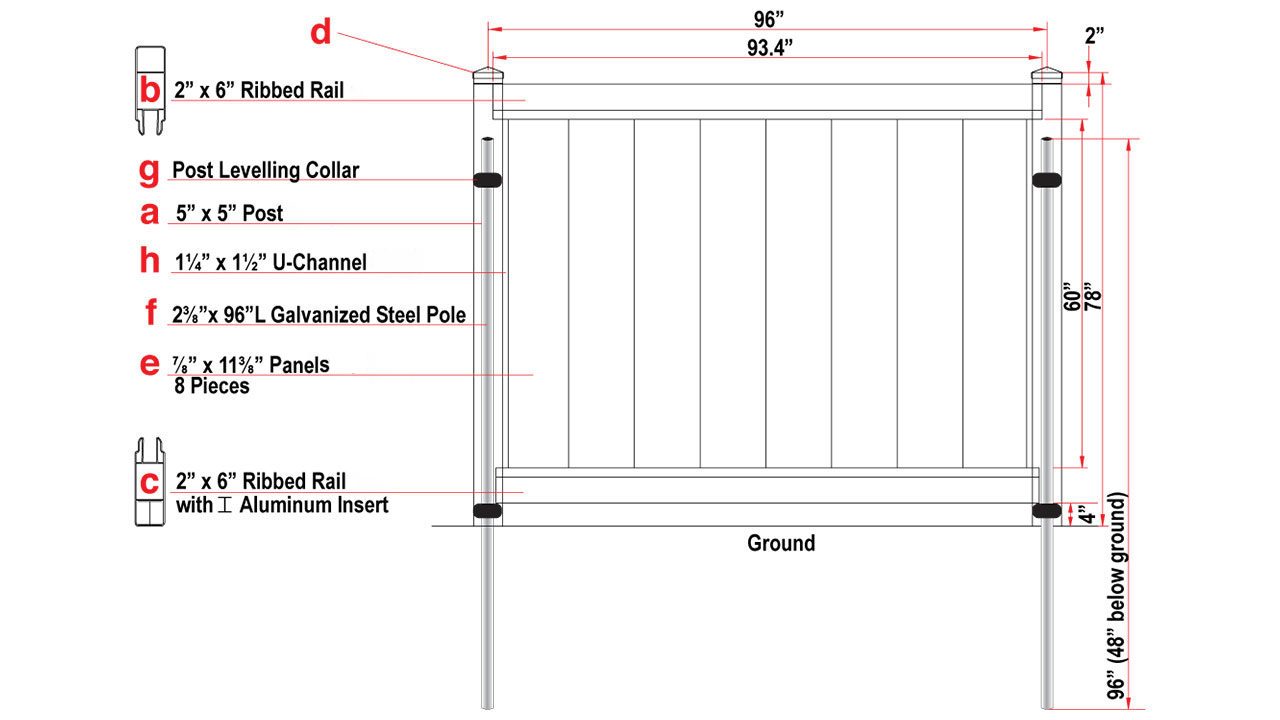
2. Learning Fence Components
3. Pounding The Galvanized Steel Posts
Make sure that all underground lines have been marked before any digging or any posts are pounded into the ground. The ideal spacing between the posts is 93 ½” for an 8′ section. If the fence is installed on a slope the distance will have to be shorter depending on the slope. A rail can also be used as a spacer between the posts. Start by laying out your fence posts to determine the best fit for the last couple of sections in your run. You do not want a 2’ long section at the end. Start by pounding one post at each end of the fence length. Place a string line around the two posts to ensure a straight line. Use a level to help make the posts plumb while pounding. The post collars will allow for some adjustment after. One tip is to slide the two post collars on before pounding the posts into the ground. The posts may “mushroom” at the top making it hard to put the collars on after. The post should be pounded into the ground 48”. To ensure correct post spacing measure the length of your bottom rail and add ¼”.
4. Setting Post Collars
Each post gets two collars. The bottom collar can be set below ground level by digging at the base of the post or above the bottom rail 12”-16” off ground. Setting the collar at the base of the post will allow for adjustment of the fence height if frost heave occurs. If this option is chosen attach the PVC post to the bottom collar with two screws. If the second option is used, when attaching the U-channel put a screw through it into each post collar. It is best to space the collars consistently e.g.) 30” apart. This makes them easier to locate once the Vinyl Post is sleeved over top. Set the bottom collars on both end posts using three self-tapping screws per collar. Next, run a string line to make all collars in line. Ensure not to “bottom out” the bottom collars against the post in line with the fence. This will make it hard to insert the bottom rail. Next, use a level and attach the top collar.
5. Setting Posts
Place all 5”x5” PVC posts over the steel posts and collars making sure they are in the correct positions, e.g.) line, corner, end, etc. There is a top and a bottom to the PVC posts. Make sure the long part is down (see picture). The long part will measure 4” from the bottom to the rail notching and the top will measure 2”.
6. Bottom Rails
Insert bottom rails into the PVC posts. The bottom rails have a metal insert, the top rails do not. The rail should go in enough to allow the notching to hold the rail inside the post. Some rails will need to be cut if there are shorter sections.
7. Setting Post Height
Set end posts and corner posts for height by inserting a screw (or two) into the lower collar through the vinyl post. Run a string over the top of posts from end to end of each fence line. Then set the rest of the posts to height by lifting to the string and fastening to collars, either through U-channel and post into top collar or bottom collar, or through the post below the rail into the bottom collar.
8. Install Pickets And Top Rails
Insert bottom rails into the PVC posts. The bottom rails have a metal insert, the top rails do not. The rail should go in enough to allow the notching to hold the rail inside the post. Some rails will need to be cut if there are shorter sections. Install the pickets into the bottom rail. If your spacing is correct no cutting is required. In a sloped section, you may need to cut the corners of pickets at the top and bottom to accommodate for the slope. After pickets are in place, insert the top rail over the pickets and into the posts. If the rail needs to be cut it is recommended that you notch the cut end, similar to the other end of the rail. – Note: If the fence is picket or lattice accent it is easiest to put the accent together on the ground first and insert after. If the fence has a middle rail repeat this step.
9. Top Rail Ties And Cap
Insert the Top Rail Tie at the top of the post. Attach it to the top rail using one screw into each rail. To install caps apply glue or exterior silicone to the inside corner of the cap. Push the cap onto the vinyl post.
10. Enjoy Your New DFS Vinyl Products
Contact us today for your free estimate
Time for a new fence? We will be happy to help get the best of the best fence in the market.